Bluetooth Controlled Car
Bluetooth Controlled CarCOMPONENTS AND SUPPLIES

A000066 iso both
Arduino UNO & Genuino UNO
×1
L298 Motor Controller
×1
Bluetooth Module
×1
RC Car
×1

ABOUT THIS PROJECT

Project:

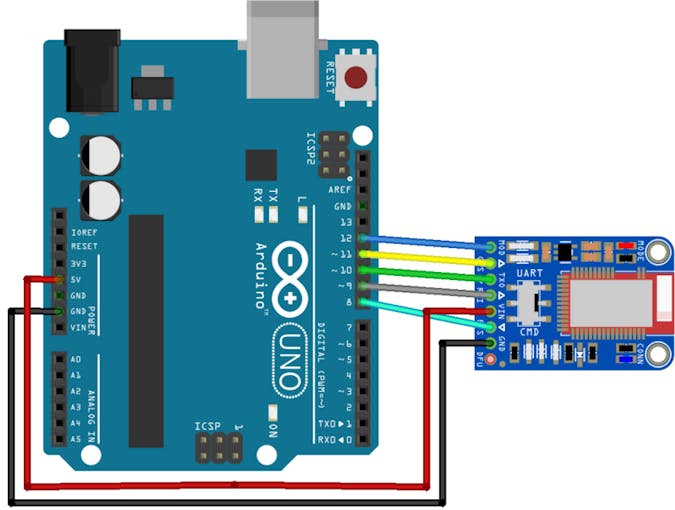
This project was an interesting endeavor, as it was mostly a guess and check routine until I found out what worked for me in the long-run. I used the Adafruit Bluetooth LE tutorial to figure out how to hard-wire this setup, and used Michael's hybrid code to power the motors and steering.
First off, here is the video of the working car!The hardware setup for the Bluetooth module is as follows:
Fritzing diagram (from the Adafruit tutorial):

The L298 Motor Controller was connected to a 9V battery, the Arduino ground and 5V, and pins 6, 7 and 8 (to pins enB, in4 and in3, respectively). The microservo used for steering was connected to digital pin 3, and the Arduino ground and 5V connections.

The code:

The code is attached below. The idea was to use the case statements in Michael's code to turn the motors on or off, or have the servo rotate left or right. These functions would obviously correlate to their respective case statements (i.e. "turn left" under case 55). I initialized everything (like the servo, setting pins to output pins, etc.) under the setup loop, and put the repeatable functions in the loop function.
If you recall, I have a servo in front of my car like this:
I added the input "degrees" that my servo interpreted.
The way I got my car to steer and go forward was the following:

Forward/up: set an output pin to high, and the other pin to low. the enable pin sets the speed
case 53:
    Serial.println ( "up");
    digitalWrite(in3, HIGH); // sets motor to forward.
    digitalWrite(in4, LOW);
    analogWrite(enB, 255); // write enable pin to highest speed (0-255)
    break; // will stop the code so that the following code in the loop does not run
Reverse/down: since the motors are connected in series, I simply needed to reverse the direction of the output/input. Enable pin still needs a value to set the speed of this reverse direction. Since my car is slow, I set it to the maximum.
case 54:
    Serial.println ( "down");
    digitalWrite(in3, LOW); // sets motor to backwards.
    digitalWrite(in4, HIGH);
    analogWrite(enB, 255); // write enable pin to highest speed (0-255)
    break;

I have two methods of steering in my code (one is commented out at the moment):
1) incremented (current): The servo is initialized at position x, in the middle of its radial span (for me, this position was 90 degrees). Under each case statement, I first incremented the value of the position x by 5 degrees in the respective direction, then wrote that to the servo. It looks like this:
     case 55:
         Serial.println ( "left");
         pos +=5;
         myservo.write(pos);
         break;
2) move to a finite position: This is easy, as rather than including the position values, you just write a position to the servo. I chose 160 for left, and 20 for right:
    case 56:
        Serial.println ( "right");
        myservo.write(20);
        break;
 And that's the extent of the modifications I made to this code.

Troubles experienced:

I'll never get tired of saying this: my motor controller still has broken enable pins on one side, and I am forced to connect the motors in series- they go much slower as a result. This, however, I will resolve by using
a new motor controller.
I played around with using ifwhile and case statements in the code to increment the steering. The issue mainly was making sure I was putting the right things in the setup and loop codes, or else the same thing could be inadvertently repeating every time the Arduino runs its loop function.
CODE

Bluetooth RC Car ControlC/C++
Uses Adafruit Bluetooth LE chip and code with some edits to control two dc motors and a microservo, allowing the car to go forwards, backwards, left and right.
// This version uses call-backs on the event and RX so there's no data handling in the main loop!

#include <SPI.h>
#include "Adafruit_BLE_UART.h"

#define ADAFRUITBLE_REQ 10
#define ADAFRUITBLE_RDY 2
#define ADAFRUITBLE_RST 9

Adafruit_BLE_UART uart = Adafruit_BLE_UART(ADAFRUITBLE_REQ, ADAFRUITBLE_RDY, ADAFRUITBLE_RST);

boolean messageReceived = false;
uint8_t message[20];

// initializing my components
int enB = 6; // enable pin for the L298
int in3 = 7; // output pin 1
int in4 = 8; // output pin 2 for the motors
#include <Servo.h> // include my servo library
Servo myservo;  // create servo object to control a servo

   // initial servo position
int pos = 85; // for my particular motor, the range is exactly from 0-180 degrees. i want the servo to start in the middle


/**************************************************************************/
/*!
    This function is called whenever select ACI events happen
*/
/**************************************************************************/
void aciCallback(aci_evt_opcode_t event)
{
  switch(event)
  {
    case ACI_EVT_DEVICE_STARTED:
      Serial.println(F("Advertising started"));
      break;
    case ACI_EVT_CONNECTED:
      Serial.println(F("Connected!"));
      break;
    case ACI_EVT_DISCONNECTED:
      Serial.println(F("Disconnected or advertising timed out"));
      break;
    default:
      break;
  }
}

/**************************************************************************/
/*!
    This function is called whenever data arrives on the RX channel
*/
/**************************************************************************/
void rxCallback(uint8_t *buffer, uint8_t len)
{
  
  Serial.print(F("Received "));
  Serial.print(len);
  Serial.println(F(" bytes: "));

  // constantly check if these are happening
      switch(buffer[2]) {
      case 53:
        Serial.println ( "up");
        digitalWrite(in3, HIGH); // sets motor to forward.
        digitalWrite(in4, LOW);
        analogWrite(enB, 255); // write enable pin to highest speed (0-255)
        break; // will stop the code so that the following code in the loop does not run
      case 54:
        Serial.println ( "down");
        digitalWrite(in3, LOW); // sets motor to backwards.
        digitalWrite(in4, HIGH);
        analogWrite(enB, 255); // write enable pin to highest speed (0-255)
        break;
      case 55: // if this buffer[2] == 55, turn left by setting servo position to 160 degrees, or increment by 5
        Serial.println ( "left");
        pos +=5;
        myservo.write(pos);
//      myservo.write(160);         
        break;
      case 56: // if this buffer[2] == 56, turn right by setting servo position to 20 degrees
        Serial.println ( "right");        
        pos -= 5;
        myservo.write(pos);
//        myservo.write(20);
        break;
    }


  /* Echo the same data back! */
  uart.write(buffer, len);
}

/**************************************************************************/
/*!
    Configure the Arduino and start advertising with the radio
*/
/**************************************************************************/
void setup(void){
  Serial.begin(9600);
  while(!Serial); // Leonardo/Micro should wait for serial init
  Serial.println(F("Adafruit Bluefruit Low Energy nRF8001 Callback Echo demo"));

  uart.setRXcallback(rxCallback);
  uart.setACIcallback(aciCallback);
  // uart.setDeviceName("NEWNAME"); /* 7 characters max! */
  uart.begin();

// setup the pinmodes for the L298 Motor controller
  pinMode(enB, OUTPUT); // all three pins are output pins
  pinMode(in3, OUTPUT);
  pinMode(in4, OUTPUT);
  // attaches the servo on pin 3 to the servo object
  myservo.attach(3); // initialize servo on pin 3
  
}

/**************************************************************************/
/*!
    Constantly checks for new events on the nRF8001
*/
/**************************************************************************/


void loop()
{
  uart.pollACI();

}

Comments

Popular posts from this blog

How to build a Wall Mounted Family Calendar and Dashboard

Build a Node.js API

Using the SoundCloud API with the JavaScript SDK